Once the MySQL Enterprise Advisors have been installed, you can configure which advisors you would like to run on a scheduled basis.
You can schedule rules by individual server or by group. This is
done by first selecting the desired server or server group from
the Server tree found on the left side of the
screen. Next select the Advisors tab.
Opening the Advisors tab takes you to the
Current Schedule page. If you have only just
installed the MySQL Enterprise Monitor then you will only see the Heat
Chart group of advisors. Clicking the
button will show all the rules in the
Heat Chart group.
Clicking the button beside any specific
rule will show the servers that this rule is running on, its
frequency, and its status. Initially, all the Heat
Chart rules are enabled.
For a more complete description of a rule, click the rule's name. This opens a dialog box that gives detailed information about the rule.
To view the advisors other than the Heat Chart group, select the
Add to Schedule link. This will show all the
advisors available for your subscription level.
Rules are grouped by functionality and displayed in alphabetic order. To expand a group click the button to the left of the advisor name.
You may activate all the rules in a group by selecting the
checkbox beside the group name. Once selected you may apply rules
against a specific server or a group of servers. A message showing
the group of servers or the specific server you have selected will
display immediately below the
button. For example, if the All Servers group
is selected in the server tree, then the message will read,
“Schedule Advisors Against All
Servers”.
To select a specific rule, expand the group tree by clicking the button. Select the checkbox to the left of the rule you wish to schedule. Click to display the following dialog box:
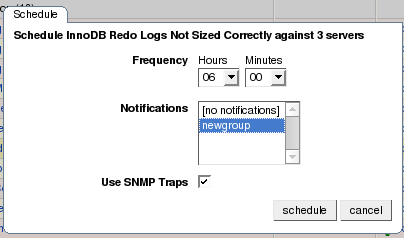
The Schedule dialog box allows you to configure the following fields:
-
Frequency– Dictates how often the rule will run. The default value for different rules varies but a rule can be set to run at any interval desired.Warning
Setting the frequency of a rule involves tradeoffs. Rule evaluation consumes system resources — CPU, memory, and disk space. While the amount consumed is small, if you run all the rules against dozens of servers on a very frequent basis, you may put a significant load on the Service Manager. So select an appropriate frequency. For example, unless you are stopping and restarting your servers frequently, rules that check server configuration variables probably don't need to run very often.
Another consideration is that certain status variables increase monotonically until a server is restarted. Examples of these are
Key_reads,Qcache_hits,Questions,Table_locks_waited, and similar variables. The value returned bySHOW STATUSfor these variables is the value since the server was started (or since the lastFLUSH STATUScommand), which is not very useful for performance tuning, especially if the server has been running for an extended period of time. For performance tuning it is much better to know the change in state (for example, delta) of these values over the last 10 minutes, 1 hour, or whatever time frame is appropriate for your application. The frequency at which you schedule a rule is the time frame used to calculate the delta values of these variables, and it is the delta that is used in expression evaluation, not the absolute value. Consequently, select a frequency that is appropriate for the metrics being used in the expression. Notifications– A listbox of users and/or notification groups who will be emailed when an advisor reaches an alert level. Single or multiple selections are allowed. For instructions on setting up notification groups see, Section 15.5.5, “Manage Notification Groups”.
Set the frequency, identify whomever you wish to notify, and click
to schedule the advisor. Upon
completion, you should see the message, Successfully
scheduled.
If you haven't set up global SNMP traps and would like your
Network Management System (NMS) to handle events related to a
specific rule then check the Use SNMP Traps
checkbox. For more information about Simple Network Management
Protocol (SNMP) see Simple Network
Management Protocol (SNMP) Traps.
Scheduling rules using the checkbox and the
button is an effective way to
schedule multiple rules. To schedule a single rule you may also
use the schedule link.
When scheduling more than one rule, you have the option of selecting a checkbox to use the default frequency of each rule or you may choose a frequency that will apply to all selected rules. When customizing the frequency, take care that you choose a value that is appropriate to all the rules selected.
Note
If the agent does not have the SUPER
privilege and InnoDB-related rules are scheduled, a warning will
appear in the DataCollection log. This also
occurs if mysqld is started with the
skip-innodb option. For more information about
agent rights see Section 15.3.3.1, “Creating a MySQL User Account for the Monitor Agent”.
User Comments
Add your own comment.